
I once tried using a zip-top bag with a piping tip. The issue with that is plastic stretches and the pressure of the frosting causes the tip to blow out of the end of the bag. At least that was the case for me. It was a buttercream icing, it wasn’t too thick, and I had a large tip. I think I eventually got the plastic coupler to snag the cut in the bag just right and was able to get through frosting my batch of cupcakes.
Sure, you can get disposable piping bags for relatively cheap nowadays. But in my case that would mean ordering them online and waiting a week for them to arrive via free shipping. And let’s be honest, I don’t really need 100 piping bags for the roughly 3 times a year I need one.
A reusable piping bag? I 110% do not want to have to clean that.
Growing up, I never knew pastry bags were even a thing. I don’t think it was until I incessantly started watching Food Network that I learned of their existence.
My mom decorates cakes. Not professionally, but she’s done her fair share of wedding cakes, birthday cakes, and any other cake you can think of. Here’s our wedding cake:

And here’s our daughter’s first birthday cake:

She always made her piping bags out of freezer paper (I always thought it was parchment, but apparently I was wrong. You can certainly use that though, if you have a wide enough roll). I kept meaning to ask her when she came to visit to show me how to make them. I always forgot.
Then I was inspired recently to tackle an item off my “baking bucket list:” Cream puffs (the others are french macarons, marshmallows, and fudge from scratch). So on a whim, I needed a piping bag. Yes, I could have used a zip-top bag, but my original plan included piping the whipped cream with a star tip (which I didn’t ultimately do). I was also low on zip-top bags and didn’t want to waste them. It was a prime opportunity to finally learn how to fold a piping bag, so I called my mom.
Let me show you how to do it. It will save you a call home and a confusing over-the-phone tutorial where you ask repeatedly “Should it look like a home plate?” The answer was always no. It shouldn’t ever look like a home plate.
All you need is a square of freezer paper, butcher paper, or parchment (like I said before, as long as it’s the wide roll – the width of freezer paper not the width of plastic wrap) and some scissors. If you’re a klutz like me, a piece of tape isn’t a bad idea.

Fold your square diagonally in half:
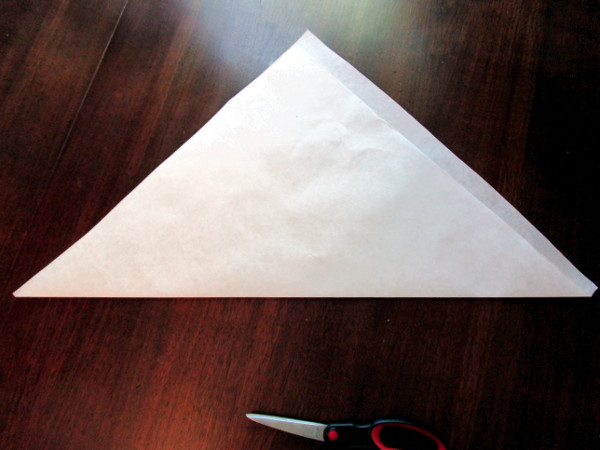
Trim off any excess on the edge:

Unfold it and cut the along the fold so you have two triangles:

You’ll only be working with one triangle from now on. You can use the other one later to make another piping bag.
**If you’re following the instructions below for the big piping bag, this is where you pick up the folding instructions**
Lay the triangle in front of you so the long side is facing away:

Fold the corner towards you like this:

Fold it again. The fold should be right along the edge of the paper from the first fold:

Fold again:

Then fold the last flap back towards you:

Secure with a piece of tape (optional):

Simply open it up and it’s ready to fill! Sort of. If you’re using a piping tip you’ll want to cut just a little bit off the point and drop in your piping tip (or plastic coupler) before you fill it.

The small bag, as it turns out, is a bit too small for a whole batch of pâte à choux. It’s by no means small… it’s perfect for decorating cakes, cupcakes, or other goodies. Just not big enough for what I needed (I could have also only put in half the dough at a time). After having dough ooze out the top of my bag and all over my hands, I spent the rest of the day contemplating how to make a bigger bag. I had my eureka moment, so here’s how to make a big piping bag out of freezer paper!
Cut a piece of paper at least twice as long as it is wide:

Fold one corner and align it with the bottom edge:

Fold the other side down and align it with the first side so that it makes a triangle with the point facing away from you:

Trim off the tail on the bottom so it makes a straight edge:

Open up your folds and cut along them. You now have a big triangle to make a big piping bag. The two smaller ones can be folded into two regular-sized piping bags.

Flip it so the long side of the triangle is facing away from you and scroll back up to the folding instructions.

If you’re wondering about my cream puff experience… aside from the oozing dough it was a good one! I’ll try to post about it soon.

Cream puffs were on my bucket baking list, too! I made them in high school, they were so good!! You’ve inspired me to make more.
LikeLiked by 1 person
I was surprised at how easy they actually were to make! I think next time, and there will definitely be a next time, I need to incorporate some chocolate…. Either a chocolate cream or a nice drizzle over the top.
LikeLiked by 1 person
Oh yummy! That sounds delicious!
LikeLiked by 1 person
Great instructions! I always struggle with this!
LikeLiked by 1 person
Great idea. Now don’t have to buy the piping bags. Thanks for linking up with us at Family Joy Blog Link Up Party this week.
LikeLiked by 1 person
This is so helpful! Thanks! 🙂
LikeLiked by 1 person
I have been looking for a way to make large piping bags. Thanks.
LikeLike